User Manual
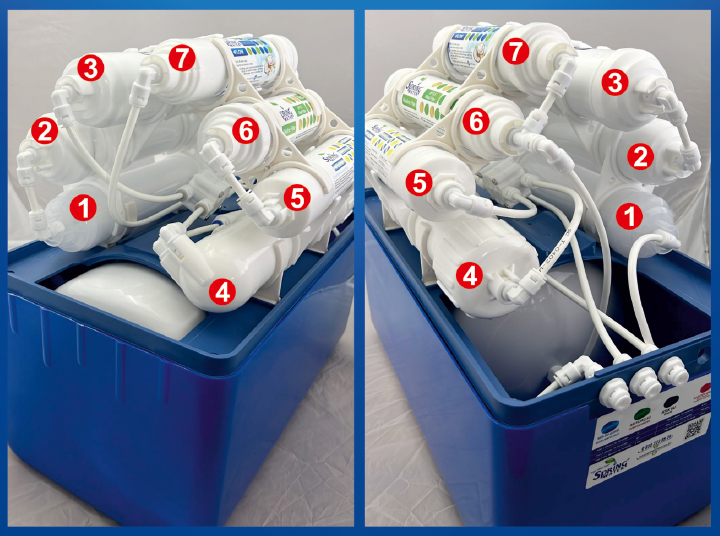
Device Filter Connection Diagram
Hoses to Filters Are Sent Separately Without Attaching To Avoid Breakage During Transport.
POINTS TO CONSIDER BEFORE DEVICE INSTALLATION
Stages of the Spring Water mineral water purification system
For the Spring Water non-pump water purification system to function, a minimum of 4 bar of mains pressure is required. In areas with insufficient mains pressure, a pump is added to boost the pressure. The mains water passes through the following stages in order:
- Spring Water 5-micron sediment filter is a pre-filtration unit that traps suspended solids and particles in the water, protecting subsequent filters. It filters out mud and sediment at a 5-micron scale.
- Spring Water activated carbon filter removes organic substances, high concentrations of carcinogenic chlorine and chlorine compounds from mains water, eliminating bad tastes and odors.
- Spring Water second activated carbon filter further removes suspended matter, residual chlorine, and gases that may have passed through the first two stages.
- Spring Water membrane filter is made of semi-permeable material with 8–12 Angstrom pores. It retains 99% of bacteria and heavy metals. Wastewater is discharged through the membrane’s waste outlet, while purified water is stored in a stainless steel tank.
- Spring Water coconut-based post-carbon filter improves the taste and adds minerals to the purified water stored in the tank. When the clean water tap is opened, the water passes through this final filter before being dispensed.
- Additional filters such as a 4-stage mineral filter, alkaline filter, or ultraviolet (UV) filter can be included depending on the model of the Spring Water device.
The operating temperature range for the Spring Water purification system is minimum 5°C – maximum 40°C. The device can purify water with a maximum input conductivity of 600 ppm and turbidity of 3 NTU. In such conditions, a pre-filter should be installed at the water inlet. Filter replacement intervals may be shortened in these cases.
PURIFICATION DEVICE FLOW DIAGRAM

BOX CONTENTS AND PRODUCT PARTS
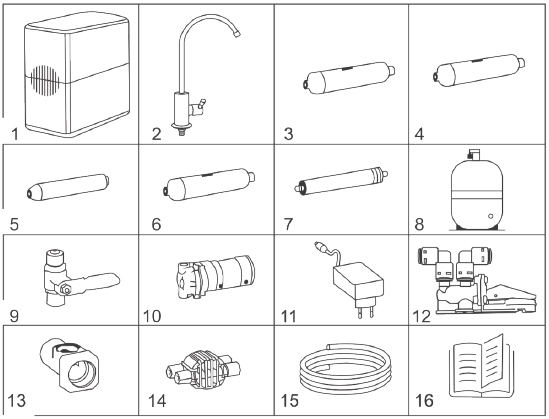
- Under-the-counter mineral water purifier
- Faucet
- Inline block carbon cartridge filter
- Inline block carbon cartridge filter
- Inline post carbon filter
- Inline 5 micron spun (sediment) filter
- Membrane
- Metal pressure balance tank
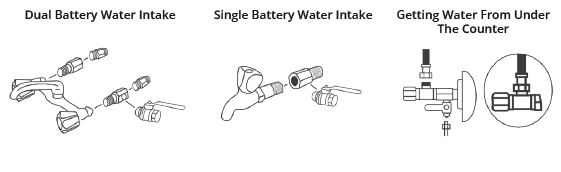
- Combo line intake
- 75 GPD Pump
- 24 Volt 1.5 Ampere Adapter (Available in pump model)
- Water leakage sensor
- Line receiving interconnection
- Automatic shut-off valve
- 6" pneumatic hose
- Warranty certificate
MATERIALS REQUIRED FOR ASSEMBLY
- Drill, steel or diamond drill bits set 6, 8 and 12mm tip and herringbone file. You should use it according to the place and ground where you will be mounting.
- Teflon tape
- Wrench (adjustable wrench or necessary open-end wrench set).
- A sharp knife or cutter knife. (For cutting the hose)
- The hose coming out of the box is divided into three parts according to the size.
DEVICE INSTALLATION AND MOUNTING PHASE
Things to Do During the Mounting Phase
- Before the installation phase, close the mains valve of the water coming to the device or the valve in the incoming line.
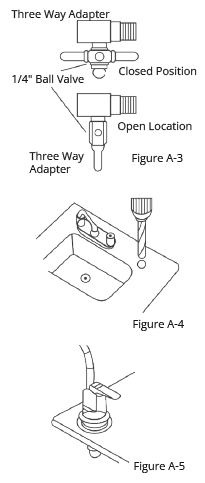
- After draining the remaining water in the pipes, mount the feed water connection adapter (3-way adapter) to the network by wrapping it with teflon tape in a leak-proof manner. (Figure A-2)
- Mount the ¼ metal ball valve on the feeding water connection adapter (3-way adapter) by wrapping it with teflon tape so that it can be opened and closed easily. (Figure A-3)
- ¼ Attach the 6mm water inlet hose to the metal ball valve. Make sure the ball valve is closed.
- After these steps, open the mains valve or line feed valve and check for any leaks.
- If the countertop or sink is to be drilled, the clean water tap must be carefully installed in terms of usage and aesthetics. After taking measurements in a way that you can find the washer, nut and record on the bottom of the countertop or sink, you can start drilling. Otherwise, you may end up drilling the wrong hole.
- If the area to be drilled is marble, granite ceramic, laminate or sheet metal sink, you should first drill with a 6 mm drill bit and then with a 12 mm bit. The drill should be operated at low speed and without impact. If the countertop is tiled cast concrete, it should be drilled with impact using a diamond bit. (Figure A-4)
- The outer length of our faucet is 7cm. If the countertop is thicker than 7cm, you need to add additional parts to the faucet as needed. Then, you should place the faucet in the hole, adjust the gaskets and tighten the nuts tightly.
- Filters must be washed and the residue on them must be removed before use. (See the Washing Procedures page)
NOTE: If you do not want to drill the under-counter sink and basin, installation can be done using a single tap. In order to change the tap you are using, please contact our authorized service for a triple tap that passes hot, cold and purified water. (An extra fee will be charged for the tap.)
DEVICE FEATURES
Placing the Filter
- Spring Water 12" Inline 5 Micron Sediment Filter
- Spring Water 12" Inline GAC Carbon Filter
- Spring Water 12" Inline Carbon Filter
- Spring Water 100GPD Memrane
- Spring Water 10" Inline Coconut Post Carbon Filter
- Spring Water 10" Inline Mineral Filter
- Spring Water 10" Inline Alkalin Filter
- After the filters are placed, open the membrane housing cover. Place the membrane into the cover that comes out of the box until it reaches the end. Then close the cover.
- After installing the faucet and connecting the remaining water line, adjust the hose length so that it is sufficient between the post carbon filter outlet and the faucet.
- Remove the record in the direction of the post carbon filter outlet and attach it to the hose and tighten it tightly by pushing it well. With the other end of the hose under the clean water tap, insert the nut and the ferrule into the hose in that order. Finally, push the hose firmly into the tap and tighten the nut firmly.

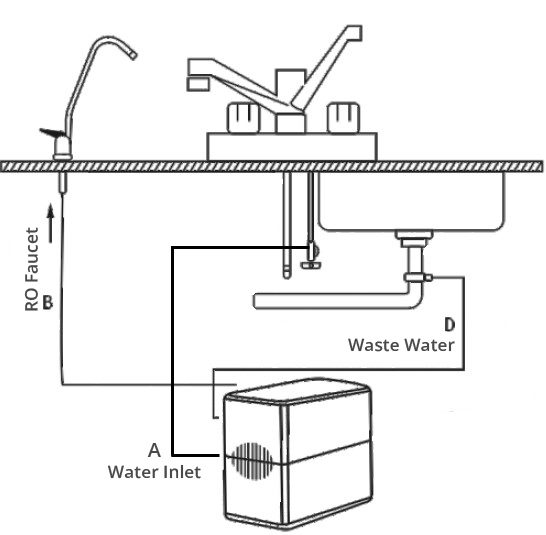
Hose Connection Diagram
As seen in the figure;
- A: Device water inlet
- B: Hose clean water outlet is connected to RO faucet.
- C: Hose should be connected from device post carbon outlet to clean water line
- D: Hose should be connected from device waste water line drains to waste water line drain.
DEVICE INSTALLATION AND MOUNTING PHASE
Operating the Device After Installation
After assembling and placing all the parts, first open the water network line to check if there is a leak. Then open the water slowly. At first, the water coming from the tap will start to flow like a rope. After the water starts to flow like this, let it run for 10 minutes. If your water does not pass from leakage to normal level during this process and flows drop by drop, it is most likely because your water pressure is low and it is not performing its purification job 100% efficiently. If you are experiencing such a problem, please see the problem and solutions section. Now your device is active and working, you can drink it safely and enjoy.
!!! Important!!!
- It is normal to see air bubbles and mineral particles in the water for 10 days after installation. This situation will decrease over time.
- The reason why it does not completely disappear is the mineral and alkali filter of the Spring Water water purifier.
- The water purifier will get better efficiency and work longer with more active use. For this reason, we recommend that you use your water comfortably as cooking water, tea, coffee, etc.
- In cases of water leakage, broken filters, etc., close the valve in the feed water and cut off the incoming line and fix the problem.
MAINTENANCE, REPAIR AND CLEANING OF THE DEVICE
Filter Replacement Times

Spring Water Membrane Replacement
- If your device is electric, unplug it.
- Close the water supply valve
- Disconnect the water inlet of the membrane housing from the hose.
- Open the membrane housing cover by turning it counterclockwise
- Take the membrane out by moving it right and left with a pair of pliers
- Push carefully until the membrane is completely seated in the housing.
After installing the membrane, replace the cover and hose in the same way, open the tap to clean the newly installed membrane filter, run the system for 1 hour and drain the water, then you can drink the purified water.

This appliance should only be used by persons who have been instructed in its safe use and who are able to understand the instructions. Children aged eight and over and individuals with limited physical, sensory or mental capabilities or lack of experience and knowledge may use the appliance only under supervision and if they understand the safety risks. Children should not be allowed to play with the appliance. Cleaning and maintenance should not be performed by children without supervision.
Washing Procedures
In order for the product you have purchased to work properly, we kindly request that you follow the washing procedure written below.
- The tank valve should be closed and the purified water tap should be opened. The plug should be plugged into the socket and the ball valve should be opened. The place where the waste line will go should be a drain line and should not be a place where there is an open front and accumulation. (It would be appropriate to connect it to the kitchen counter drain.)
- Sediment filter and active carbon filter (Filter 1 and 2) are washed together, the black water that comes out should be drained out without being given to the block carbon filter (Filter 3). After obtaining clear water, block carbon (Filter 3) is washed with the water passing through the 1st and 2nd filters and the black water coming out of the block carbon should be drained out. (This water should not be given to the 6th filter, if there is a 4th and 5th filter.) Block carbon (Filter 3) is washed for 10 minutes.
- With the clean water coming out of the first 3 filters, the Post Carbon (5th Filter) is washed and its water should be drained out without attaching the Membrane Filter (4th Filter). After getting clear water, the Mineral or PH filter (6th Filter) is washed if there is one and this process continues until getting clear water.
- The Membrane Filter (4th Filter) is placed in the Membrane container housing with its seals at the bottom (these seals should be wetted and turned to the right to fit into the housing.) and the housing cover is closed. The first water entering the membrane should be thrown out without entering the tank and post carbon or the mineral filter if there is one. The water should be drained out directly until 8 liters of water are taken from the membrane. (This period will take 45-60 minutes.)
- The tank valve should be opened and the clean water tap should be closed. The purified clean water should be filled into the tank, this process will take 45 minutes. At the end of 45 minutes, the tank should be filled at least once, the clean water tap should be opened and it should be drained out.
- At the end of these processes, you will drink safe and clean water.
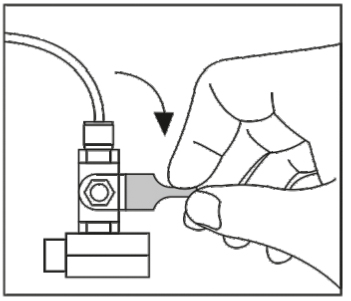
The stages of membrane change, as seen in the figures, are;
- Turn the clean water tap to the open position.
- Loosen the record on the water inlet section of the membrane chamber and disconnect it from the connection.
- Open the membrane chamber cover (with a pair of pliers) and remove the membrane by turning it from right to left.
- Clean the membrane chamber with a disinfectant (chlorinated water) and rinse the chamber.
- Wet or wipe with a damp cloth so that the O-ring (gasket) at the bottom of the new membrane filter can be placed more easily. Push the membrane into its chamber by turning it right and left and place it in the same way. Close the membrane chamber cover and tighten the cover tightly with your hand or the keys given to you.
- Finally, reattach the membrane filter water inlet hose.
Post Carbon Filter Replacement
- Close the inlet water to the device and turn the clean water tap to the open position.
- Detach the hoses at the post carbon filter water inlet and outlet and take the filter out.
- Remove the apparatus connected to the water outlet of the filter and place the new filter into the device.
- Insert the hose union connections.
ATTENTION! Hot water should never be given to the purifier. Otherwise, all filters will be damaged and the device will be out of warranty.
Note: Products without a pressure reducer are out of warranty.
The water purifier is a product designed for easy installation and maintenance. The important thing is not to exceed the periodic replacement periods of the filters and to use the device cleanly. If the necessary maintenance and repair are not done, the efficiency of your device will decrease. Such situations may cause your warranty document to lose its validity.
Cleaning the Device
Your water purifier should be disinfected at least once a year as follows.
- Turn off the feeding water to the device.
- Open the tap of your purifier and empty the storage tank. (Applies to models with tanks.)
- Add a teaspoon of chlorine to the filter housing and reassemble.
- Open the feeding water.
- Fill and empty the storage tank twice and change all filter cartridges. (Applies to models with tanks.)
OPERATING THE DEVICE AFTER MAINTENANCE
Matters to be followed for simple repair of the device
In order for your device to fully perform its functions and have a long service life, the following points should be taken into consideration. Otherwise, it will not be covered by the warranty.
- Do not use in water with a water temperature above 40°C.
- Place the device on a flat surface or fix it.
- Do not play with the valves on the device except when necessary.
- If the device is not used for a long time, close the supply valve to the device. When it is to be operated, perform the initial commissioning steps.
- Keep your device clean by wiping it with a damp cloth at regular intervals and avoid harsh abrasive cleaning materials.
After opening our valves, you can open the water line coming to our device. Then open our RO faucet and check if there is any leakage. You can use your wastewater easily and safely.
Matters to be Considered During Transportation and Shipping
First of all, apply the work safety rules.
- During transportation or shipping, drain the water inside the storage tank.
- Turn off the water line coming to the storage tank and carefully unplug the power plug if your device has a pump.
- Carefully remove the purifier from its location.
- In order to prevent the parts of your device from getting lost, make sure that they are kept in the same place without being separated.
- Store the device in a dry and closed place.
- Be careful not to drop the product during a change of location, not to shake it, and not to damage it from impact, heat, humidity and dust. Do not expose it to the sun.
- You can get support from our authorized services to avoid unexpected damages during transportation and shipping.
Warranty and Spare Parts Supply Period: The warranty period of our product is 2 (two) years from the invoice date. You can obtain spare parts for this product from our company for 10 (ten) years from the delivery date. The warranty is only valid for malfunctions that occur in the device, and no rights or compensation can be claimed under any other name.
DEVICE INSTALLATION AND MOUNTING PHASE
Matters Regarding Warranty that Customers Should Pay Attention to
It does not cover the elimination of malfunctions caused by using the water purifier for purposes other than its intended use, and the consumer should pay attention to the following points.
- Damages and failures caused by usage errors
- Damages and failures that occur during loading, unloading and transportation after the product is delivered to the customer
- Damages and failures caused by reasons that may occur in the electrical installation, such as low or high voltage
- Failures caused by using the product contrary to the matters stated in the user manual
- Membrane and filter changes are not covered by the warranty. They are consumables.
- The warranty period of the product is 2 (two) years against manufacturing defects.
- Exceeding the maximum period required for repair
Damages and malfunctions caused by the above-mentioned issues are not covered by the warranty and service can be provided for a fee. If the warranty document is tampered with or altered, the warranty document in your possession is invalid.
Matters to be Considered
- Do not clean the chrome tap with bleach and descalers.
- There may be air bubbles in the incoming water during the first installation.
- Filters are not replaced under warranty.
- The device discharges ½ waste water.
- Only the first installation of the device is provided free service.
Damages and Malfunctions Caused by Usage Errors
- Loss of original parts of the device or disassembly contrary to instructions
- Damage and failures arising from physical impact, scratches, breakage, etc.
- Damage and failures arising from transportation, freezing and storage conditions.
- Damage and failures arising from changing or damaging electrical cable connections.
- Damage and failures arising from painting or staining any part of the product.
- Damage and failures arising from sticking a label that cannot be removed to the product.
- Damage and failures arising from operating the device with water below 5°C and above 40°C.
- Damage and failures arising from electrical networks.
- Damage and failures arising from placing foreign materials, filters, tanks, consumables that do not belong to our company inside the product exclude the product from the warranty.
- Damage and failures arising from incorrect location selection, placement, incorrect capacity selection, incorrect installation pipe connections and unintended use.
- Damage and failures arising from operating the product without water or with insufficient water.
- Damage and malfunctions resulting from the user's failure to perform periodic maintenance and checks.
- Damage and malfunctions caused by clogging of the wastewater drainage line and continuing to operate the device in this manner.
IMPORTANT SAFETY AND ENVIRONMENTAL INSTRUCTIONS & CONSUMER RIGHTS
Information on Situations That May Be Dangerous or Harmful to Human and Environmental Health During Use
- Make sure that the ground where the electrically connected devices are located is dry and insulated.
- There is no significant issue that will pose a threat to the environment or human health during use.
- When your device reaches the end of its life, send it for recycling.
Device Lifespan
If the periodic maintenance is performed and operated as specified in the user manual, the product's service life is 10 (ten) years. Otherwise, this period may be shortened. As long as it is not exposed to high heat and sunlight, you can use the device efficiently for many years.
Information on Using Your Device Efficiently in Terms of Energy Consumption
- If you do not use the Spring Water Pump Water Purifier for more than 3 days, turn the product off and unplug it.
- Be careful not to leave the tap on.
- In cases of low or high voltage, unplug the power plug to prevent damage to your device and to avoid excessive electricity consumption.
- Avoid wasting your water.
- Do not place your device in a place where it will receive direct sunlight or next to devices that emit heat.
Applications Regarding Consumer Complaints and Objections
- If the seller does not provide the warranty document, the consumer may apply to the General Directorate of Consumer Protection and Market Surveillance of the Ministry of Customs and Trade.
- In case of disputes that may arise regarding the exercise of the rights arising from the warranty, the consumer may apply to the consumer arbitration committee or consumer court in the place where the consumer transaction is made or where the consumer is located.
Optional Rights Granted to Consumers in Article 11 of the Law
- If it is understood that the product is defective, the consumer may;
- Declaring that he/she is ready to return the product sold and withdraw from the contract;
- Keep the product sold and request a discount on the sales price in proportion to the defect,
- Request that the product sold be repaired free of charge, all expenses being borne by the seller, unless it requires excessive expense;
- If possible, request that the product sold be replaced with a defect-free equivalent, and use one of the optional rights. The seller is obliged to fulfill this request that the consumer prefers and fulfill this demand that he/she deserves.
- The consumer's rights of free repair or replacement of the product with a defect-free equivalent may also be used against the manufacturer or importer. The seller, manufacturer and importer are jointly and severally responsible for fulfilling the rights in this paragraph.
- If the consumer exercises his/her right to free repair;
- Failure occurs again within the warranty period,
- Exceeding the maximum period required for repair,
- In cases where it is determined by a report by an authorized service station, seller, manufacturer or importer that repair is not possible, the consumer may request the refund of the price of the product, a discount in proportion to the defect or, if possible, the replacement of the product with a defect-free equivalent from the seller. The seller cannot reject the consumer's request in such cases. If this request is not fulfilled, the seller, manufacturer and importer are jointly and severally liable.